View Form method='post' enctype='application/x-www-form-urlencoded' Data
1. Introduction
In this example, a form with textbox, textarea, selectbox (a.k.a., dropdown), checkbox, and radio button controls, and method='post' and enctype='application/x-www-form-urlencoded' attributes is submitted. When the form is submitted, for each control, the name attribute value and the user input value is concatenated as a string separated by an equals sign (=) character:
controlName=controlUserInput // Control name=value pair string.
And because the form contains multiple controls, each control name=value pair is concatenated as a string separated by an ampersand (&) character:
controlOneName=controlOneUserInput&controlTwoName=controlTwoUserInput // Form data string.
enctype='multipart/form-data' attribute, the resultant form data string would be very different and not so conveniently organized. Hence, the enctype='application/x-www-form-urlencoded' attribute is recommended to POST forms that submit textboxes, textareas, etc. The enctype='multipart/form-data' attribute is recommended to POST forms that submit files.The form data string is sent in the body of the HTTP POST request to the resource specified by the form action attribute. In this example, the action attribute is action='http://localhost:8001/form_post_urlencoded_submitted', where http://localhost:8001/ is a Node.js (nodejs.org) web server, and /form_post_urlencoded_submitted is a Node.js route.
This example is designed to be downloaded and run on your computer. Node.js is a runtime environment/API for JavaScript applications. To run a Node.js application on your computer, Node.js and any npm (npmjs.com) packages containing modules that the Node.js application requires must be installed. In this example, the Node.js web server uses only native Node.js modules (i.e., modules included/bundled with Node.js), which means there is no need to install any npm packages.
This example consists of two files: 1.) form_post_urlencoded.html, the form; and 2.) nodejs_web_server.js, the Node.js web server. To run this example, first start the Node.js web server. The Node.js web server is coded to listen on http://localhost:8001/. Then load the form in the web browser, interact with the form, and submit the form. The form is coded to be submitted to http://localhost:8001/form_post_urlencoded_submitted. When the form is submitted, the form data string is sent in the body of the HTTP POST request to the Node.js web server request.on() method data event callback function, which accepts the incoming data stream, assembles the chunks into the form data string, and assigns the form data string to the requestBody variable. When the HTTP POST request ends, the Node.js web server request.on() method end event callback function is called. In the callback, the /form_post_urlencoded_submitted route processes the form data string, extracts or determines the user input for each control, and responds with a web page that displays the submitted form data.
1.1. Web Browser Support
Web browser support: IE8+, ED12+, FF1.5+, CH2+, OP7.50+. IE6 - 7 not tested.
1.2. Node.js Support
Node.js support: Node.js 8+, 10+, 11+. Node.js 7-, 9 not tested.
1.3. How To Download And Try On Your Computer
To download and try on your computer:
- Install Node.js:
- Download Node.js from Node.js Downloads (nodejs.org). The Long Term Support (LTS) version of Node.js is recommended over the Current version of Node.js. For Windows, download the Windows Installer (.msi) file.
- Install Node.js. For Windows, double click the downloaded .msi file and use the default settings.
- Test the install:
- Open the terminal (Linux)/command prompt (Windows). Alternatively, open the Node.js command prompt created by the Node.js installer.
- Type node.exe -v and press Enter.
- If the version of Node.js appears, Node.js is properly installed.
- Download the following source code zip file to your computer: view_form_post_urlencoded_data.zip (learnwebcoding.com) - Released 18 Nov 2018. Size: 6,253 bytes. SHA-256 checksum: ce6245af4477651aab4363ce595542e01d346ee8202601a7bc4f2d0c4bde6f87.
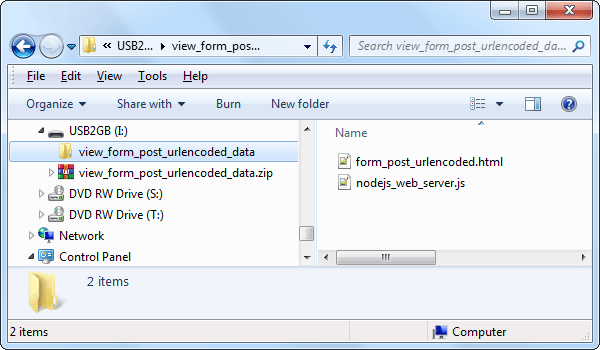
- Extract the downloaded zip file. In this example, view_form_post_urlencoded_data.zip is extracted to the view_form_post_urlencoded_data folder:
 The location of form_post_urlencoded.html and nodejs_web_server.js on your computer does not matter. They do not even need to be located in the same folder. Accordingly, leave them where they are, or move one or both of them to a different location.
 - Start the Node.js web server:
- Open the terminal/command prompt. Alternatively, open the Node.js command prompt created by the Node.js installer.
- Navigate the terminal/command prompt to the drive/directory containing nodejs_web_server.js.
- Type node.exe nodejs_web_server.js and press Enter.
- If the
Node.js web server listening on http://localhost:8001/.
report appears, the Node.js web server is started:
To stop the Node.js web server, close the terminal/command prompt or press Ctrl+c. - Load form_post_urlencoded.html in the web browser. This can be done by double clicking the form_post_urlencoded.html file, which loads it in the default web browser. Alternatively, copy form_post_urlencoded.html to your local HTTP Server and point the web browser to the URL for form_post_urlencoded.html on your local HTTP Server.
- Interact with the form, click Submit, and repeat as desired. The form is submitted to http://localhost:8001/form_post_urlencoded_submitted. Each time the form is submitted the Node.js web server responds with a web page that displays the submitted form data:

1.4. Abbreviations
- IE = Internet Explorer.
- ED = Edge Legacy 12 - 18 (EdgeHTML based) and Edge 79+ (Chromium based).
- FF = Firefox.
- CH = Chrome.
- OP = Opera.